You cannot select more than 25 topics
Topics must start with a letter or number, can include dashes ('-') and can be up to 35 characters long.
12 KiB
12 KiB
| title | marp | paginate | math | theme |
|---|---|---|---|---|
| Project management 1. Git basics | true | true | mathjax | buutti |
Project management 1. Git basics
Repositories
- Repository ("repo") is essentially a place to store code files in
- Usually, we are dealing with two repositories: a local and a remote one
- A local repository is the one on your computer
- A remote repository is stored in a cloud service like GitHub
- Here is an example of a remote repository on GitHub
- Changes are synced between these two repositories manually
Git commands
- You have to tell everything you want to happen to Git explicitly by using Git commands
- Commands are of the form
git commandname - Some commands include handles that give extra modifiers to the commands:
git commandname --handleor a shorthandgit commandname -h
Getting started with GitLab
- Go to www.gitlab.com and create a new account, if you don't already have one
- If you have an existing GitHub account, you can use it to log into GitLab
- (You'll need to set a password to GitLab after logging in)
- After logging in, you can create a new project
- This is what GitLab calls repositories
- In GitLab, projects are located in groups or namespaces
- You should have separate repositories for different programs
- We will store future home assignments in a single repository
- Larger projects will have their own repositories
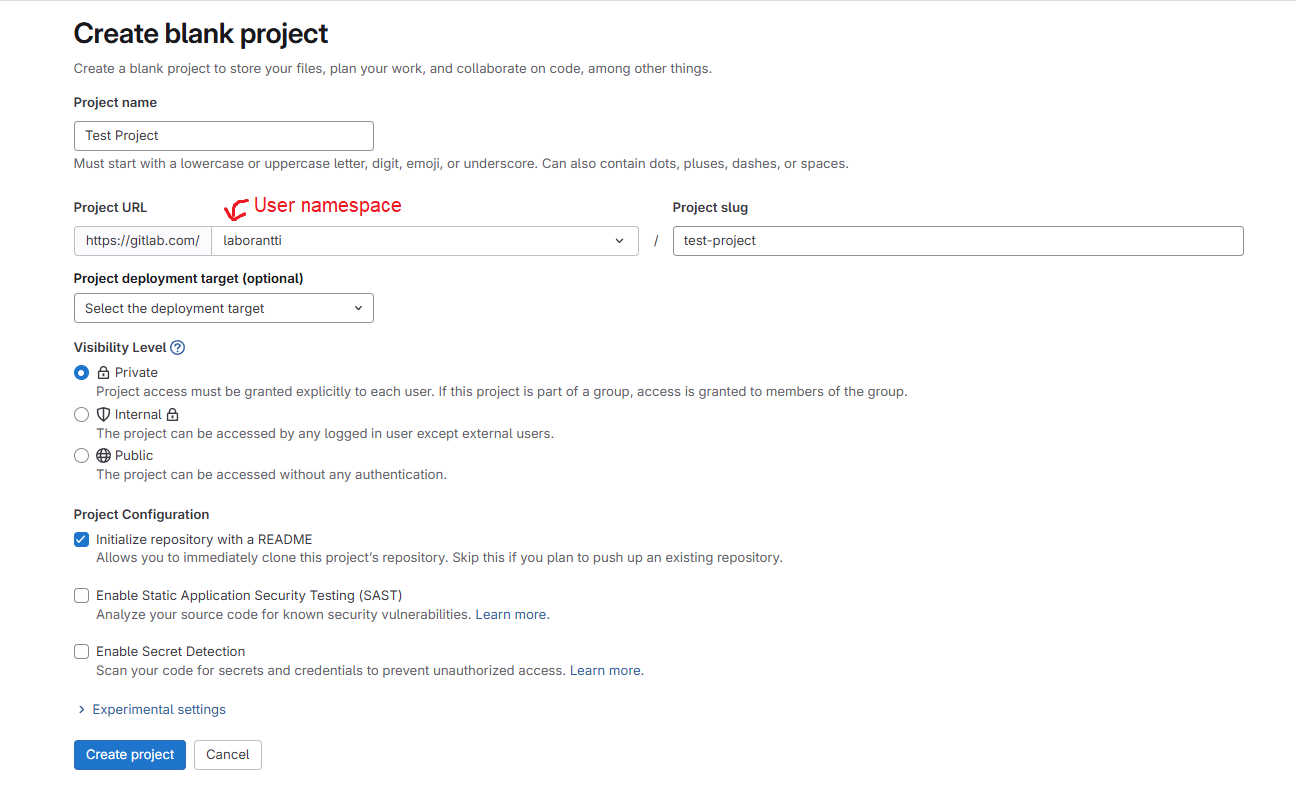
Creating a repository
- In GitLab, New Project > Create blank project
- Give a name to the project, which automatically becomes its URL (see: Project slug)
- Use your own user namespace (Good for personal projects)
- You can set project visibility to Private (only you can see it) or Public (anyone can see it)
- If you want, you can initialize the repository with a README.md file
- It's a Markdown file, essentially a text file containing information about the project.
- Note: These lectures are also written in Markdown, and you can use Markdown syntax to format text on Discord. It's neat!
Initializing a repository
- Initialization needs to be done for every new Git repository
- There are two ways to initialize a repo:
- Note: Never initialize a Git repository in a cloud storage folder!
.git folder
- Initialization adds a hidden
.gitfolder inside a directory- This is where Git stores all its repository data.
- Do not touch it! Let Git handle its contents on its own.
- The
.gitfolder ONLY appears in the root directory of the repository- If you see the
.gitfolder in any of the subdirectories of the repository, something has gone wrong!- You might have initialized a repository inside repository
- This should never happen!
- If you see the
git clone
- Remote repositories have an URL address that can be used to download the code to your machine
- The address can be found under the Clone button in the repository webpage
- Use the URL to download a remote repository:
- Run
git clone <URL> - Example:
git clone https://github.com/borbware/unity-basics-course.git - Remember: this initializes the repo, so
git initnot needed.
- Run
- Simplest way to create a new, empty repository:
- 1 - Initialize the repo in the Github/Gitlab/etc website
- 2 - Clone the repo.
Exercise 1a. Cloning a repo
Create a new repository on GitLab and clone it with HTTPS to your machine.
Basic Git workflow
- A common Git workflow consists of three steps:
- These are the steps you have to go through every time you want Git to know about the changes you've made!
- So, after writing some changes, you do this:
- Stage: You tell Git what files you've changed (
git add) - Commit: You tell Git what changes you made in that file (
git commit) - Push: You upload those changes to a remote repository (
git push)
Note: git status
- When inside a repository, using the command
git statusshows your current situation. - If you're unsure what to do, it's never a bad idea to run
git status
git add
- The first step is staging with
git add:- The command
git add readme.mdstages the filereadme.md - After doing it,
git statustells this:Changes to be committed: (use "git restore --staged <file>..." to unstage) modified: readme.md
- The command
- With
git add file, you tell Git that you have done something tofile, and want to record those changes into Git history.- This doesn't record those changes yet! This is just a preparation step.
- To undo
git add readme.md, usegit restore --staged readme.md - Note 1: Use
git add <filename> -pif you only want to stage some lines from a file you've worked on. - Note 2: You can use
git add .to stage all the files in your current folder and its subfolders at once- This is a neat way to shoot yourself in the foot and stage something you didn't intend to!
git commit
- After you have staged all the files you want, the second step is to commit your changes
- In the commit, you will explain what changes you've made
- This message will be visible in the Git history
git commit -m "add new feature"- Commit message should clearly, concisely tell what kind of changes you have made
- Prefer present tense ("Do x" instead of "Did x")
- Every new commit creates a new point in the project timeline.
- You can always jump between different points in timeline (See
git checkout)
- You can always jump between different points in timeline (See
git push
- The third step is pushing the changes to a remote repository
- The previously-made commit action is local
- No changes have gone to the remote repository yet!
- To upload changes to the remote repository, use
git push - Then you're done, and you can check your changes are visible in the remote repository
Setting upstream
- Note: When pushing for the first time, Git might nag you:
fatal: The current branch master has no upstream branch. To push the current branch and set the remote as upstream, use git push --set-upstream origin main - You can just follow its orders (see the command on the third line!) and you're good to go
- Generally, when Git gives you a warning, error, or some other message, it's a good idea to read it and follow the orders.
Exercise 1b. Pushing changes
Continue the previous exercise.
- In your local repository, create a new file
GitTest.mdwith some lines of text in it. - Commit and push changes to GitLab.
- Go to GitLab and see that the file is there!
git init
git clonealways creates a new folder for a project- If we have started working on a project without using Git, and have a project folder locally, it might be easier to use
git initto initialize the project instead - To do so, navigate to your project folder in the command line, and use
git initto make your current folder a new Git repository
git remote
- Now, your local repo needs to be connected to a remote repository
- Create an empty remote repo with no Readme file, so your remote repository doesn't clash with your local one.
- If you have initialized a Git repo with
git init, you can't usegit cloneto connect your local repo to a remote one- Instead, run
git remote add origin <URL> - Here, the name
originrefers to the remote repository originis just the default name for a remote: other names can be used as well
- Instead, run
- To check which remote repository the current local repository is linked to, use
git remote -v
Exercise 2. Initializing a repo the local way
- Initialize a new repository locally with
git init. - Create a new file
GitTest.mdwith some lines of text in it. - Commit changes.
- Create a new empty repository on GitHub.
- Use
git remote add origin <url>to connect your local repo to the GitHub repo. - Push changes to GitHub. Go to GitHub and see that
GitTest.mdis there!
git pull
git pullapplies changes from the remote repository into the local repository- Counterpart to
push, but does actually two commands in one - It's the same thing as doing
git fetch <branch>, and thengit merge <branch>"
- Counterpart to
- Using
git pullis very common when working in a team- Note: During teamwork it's a good idea to always pull before pushing
- If you only work alone on a single computer, seldom needed
Extra: HTTPS vs SSH
- There are two ways to communicate with GitHub, HTTPS and SSH
- HTTPS:
https://github.com/borbware/unity-basics-course.git- The easier way
- You log in with your GitLab credentials that get stored in the Git Credential Manager
- SSH:
git@github.com:borbware/unity-basics-course.git- Connecting to GitLab with SSH
- Connecting to GitHub with SSH
- You need to generate a computer-specific SSH key and add it to your GitHub settings
.gitignore
- Sometimes your project has local files that should NOT be uploaded to GitLab
- List those files in a
.gitignorefile in your Git project folder
- List those files in a
- You can create it by yourself and define file names or folders which Git will then ignore in the commits, e.g.,
someScript.cs /folder *.html - Note: If you add a file to
.gitignorethat was committed earlier, Git doesn't "forget" it automatically- You can make Git forget it with
git rm --cached filename
- You can make Git forget it with
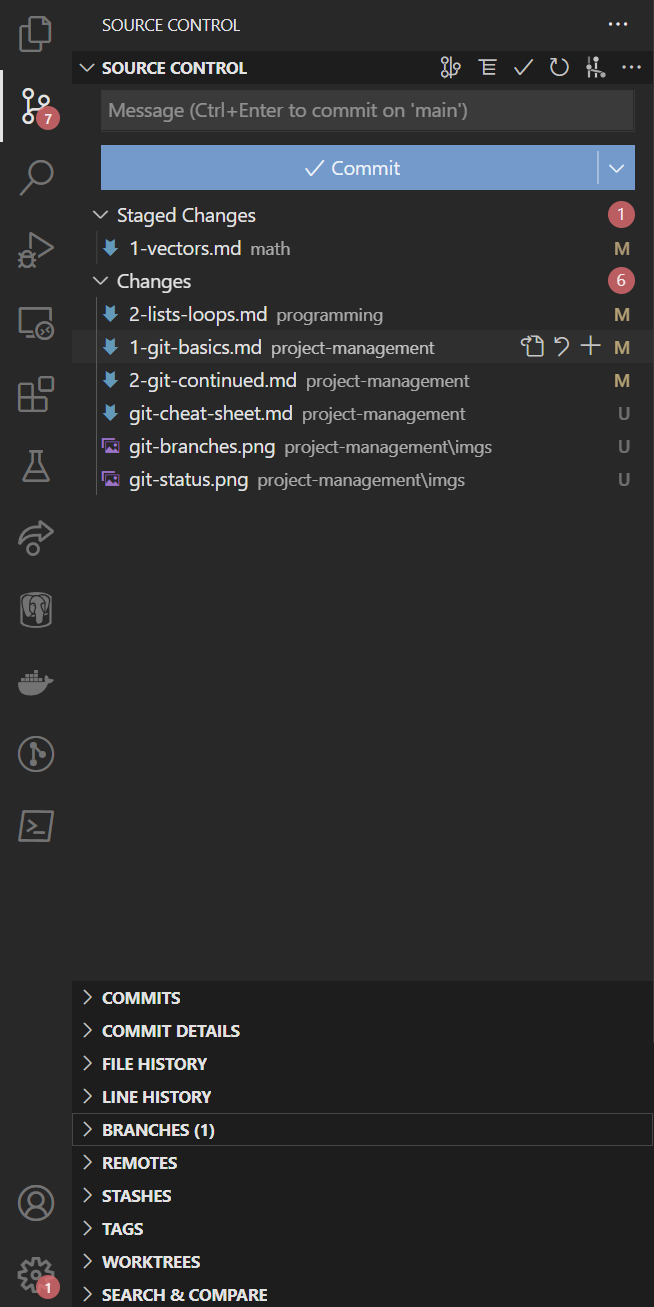
VS code: Source control
- The source control tab is very useful for managing your Git workflow
- Unstaged changes are shown under Changes
- Press "
+" to stage a file
- Press "
- Staged files are shown under Staged changes
- Press "
-" to unstage a file - Press "
\curvearrowright📄" to open the file
- Press "
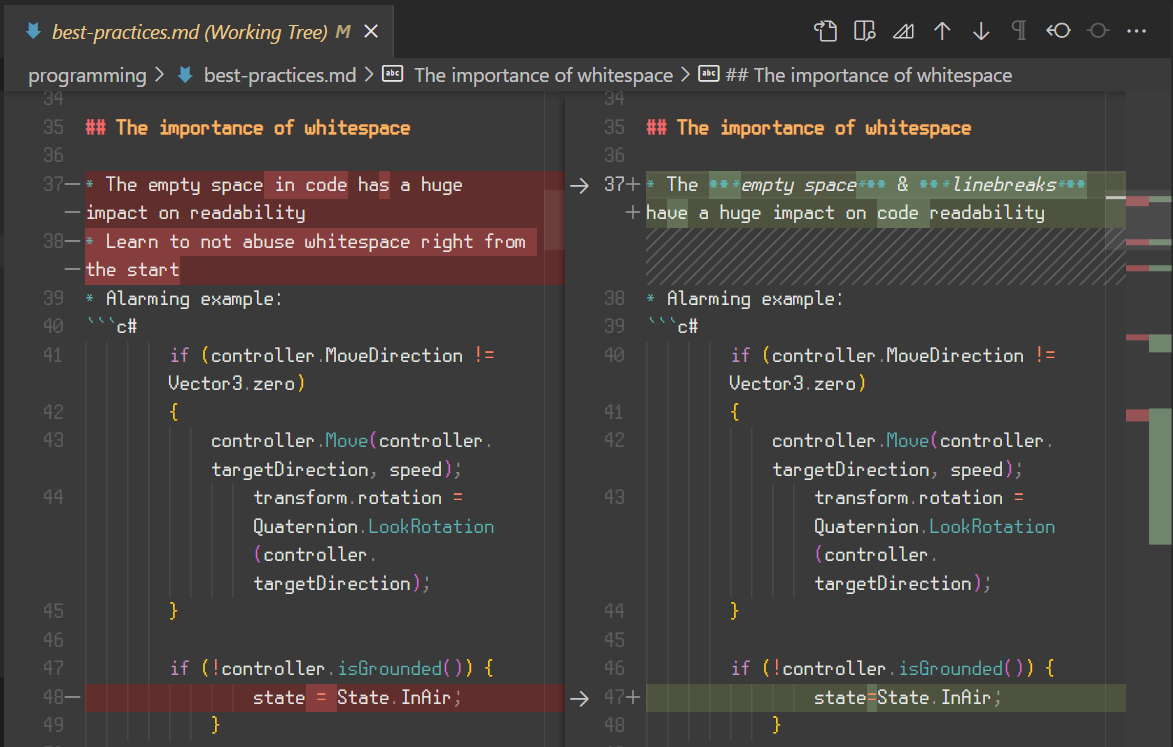
- Click the filename to see what changes you've made in a side-by-side comparison view (see the next slide!)
- Press "
\curvearrowleft" to discard the changes made to the file (be careful!)
Exercise 3. Git collaboration
Work on this exercise with your group.
- Choose someone's test repository from Exercise 1a to use in this exercise.
- While others clone the repo to their machine, the owner should add other group members as collaborators of the repo in the repository's settings on GitLab.
- Left sidebar: Manage > Members
- Click Invite members and add others as Developer or Maintainer.
- Then, everyone should make changes to the markdown file in the repository!
What happens if you make changes to the same line simultaneously?
Note about longer push and pull commands
- After initialization, why don't
pushandpullcommands work?- Answer: because when you don't clone the repo, but add the remote into an empty repo with
git remote add origin, the remote and local branches aren't connected yet.- Thus, Git doesn't yet know which branch to pull from
- You can decide it manually on each pull with
git pull origin main
- The branches can be connected in the first
pushwithgit push --set-upstream origin main - Afterwards, we can just use
git pushandgit pull.
- Answer: because when you don't clone the repo, but add the remote into an empty repo with
Troubleshooting: master vs. main
error: failed to push some refs to [your-url]
- Possible reason: GitLab has a
mainbranch, while your local repository hasmaster - Fix: Run
git branch -m mainto rename your localmastertomain