You cannot select more than 25 topics
Topics must start with a letter or number, can include dashes ('-') and can be up to 35 characters long.
11 KiB
11 KiB
| title | marp | paginate | theme |
|---|---|---|---|
| Project management 2. Git continued | true | true | buutti |
Project management 2. Git continued
Branches
- A Git repository can have multiple branches
- By default, a Git repository has only one branch
- named either
masterormain
- named either
- Using multiple branches makes it possible to work on new features step by step in their own feature branches
- Meanwhile, the
masterbranch is kept clean and in a working state - Only when the feature is completed, the branch is merged into the
masterbranch!
- Meanwhile, the

Active branch
- Even though your local repository can have multiple branches, only one of them is active at a given time
git statustells you firsthand which branch you are on:On branch master
git branch & git checkout
- You can create a new branch with
git branch <branchName>- The new branch is not empty: it contains a copy of the code of the branch you executed this command in
- Note:
git branch <branchName>does not make the branch active! - To make the branch active, a.k.a "move" to the branch:
git checkout <branchName>.- For example, to move back to master use
git checkout master
Local vs. remote branches
git branch <branchName>only creates a local branch- When you try to push changes from a new local branch, Git nags you that a matching remote branch doesn't yet exist
- Git tells you how to create the remote branch:
git push --set-upstream origin <newBranch>- Afterwards,
git pushpushes the changes to the matching remote branch
- Git tells you how to create the remote branch:
Extra branch commands
- Handy command:
git checkout -b <branchName>- It's a shorthand for
git branch <branchName>+git checkout <branchName>
- It's a shorthand for
- Get a list of local branches with
git branch- ...and all branches (incl. the remote ones) with
git branch -a
- ...and all branches (incl. the remote ones) with
- Delete a local branch with
git branch -d <branchName>- Remote branch can be deleted in the GitHub/etc website
- ...or with
git push origin -d <branchName> - Note: If deleted remote branches still show up in
git branch -a, you can use the commandgit remote prune originto remove them from the list.
git merge
- So you've been working on a feature branch. What next?
- When the feature is done (and all the broken things fixed), you want to apply your changes back to
master - For this, we use
git merge <branchToMerge>- It applies changes from
<branchToMerge>to the current active branch
- It applies changes from
masterbranch is usually (and should be) protected, so we can't merge our new code tomasterdirectly- Instead, we do the inverse.
Merging with a pull request
- Make sure you have the newest version of the
masterbranch:
- Checkout
masterbranch - Pull changes from GitHub/etc
- Checkout the feature branch
- Merge the contents of
mastertofeatureBranchwithgit merge master
- Then, create a pull request on GitHub/etc (In GitLab, it's called merge request!)
- This creates a formal process for merging your remote feature branch to remote
master - This adds a layer of protection to the
masterbranch: no direct merging!
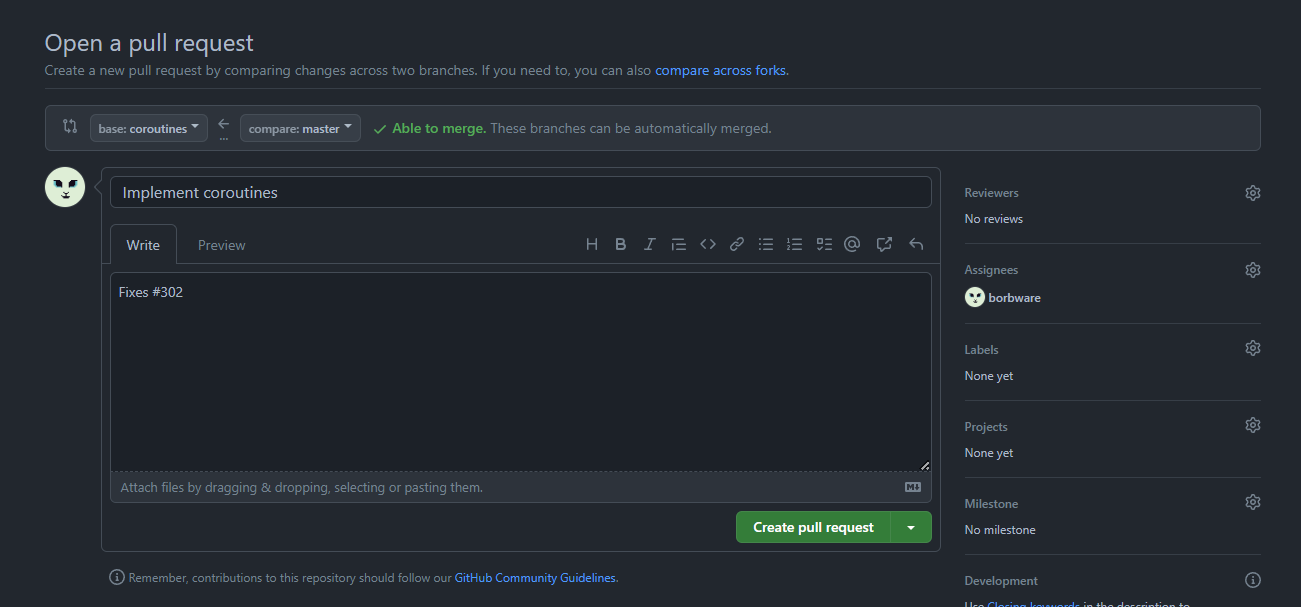
- UI of a new pull request (Pull requests > New pull request) can be confusing...
- base is the branch you're merging, compare is the branch you're merging into!
If automatic merge fails...
- Pull remote changes to your local
master.- Pro tip: If you're on your feature branch, you can do this quickly without changing branches with
git fetch origin master:master
- Pro tip: If you're on your feature branch, you can do this quickly without changing branches with
- Merge changes from
masterto your local feature branch. - Fix the ensuing conflicts (see next section)
- Push your new local branch to GitHub/etc
Extra: Merging without a pull request
- First, checkout the
masterbranch withgit checkout master - Then, do a
git pullso you have the newest version of themasterbranch- Someone else might have done changes to it while you were working on your feature!
- Then, merge
<featureBranch>tomasterwithgit merge <featureBranch>- Fix conflicts
Exercise 1. Pushing onwards
Continue the exercise from Git Basics or create a new repository for these exercises.
- Create a new branch (with a name
new-feature, for instance) in your local repository. - Checkout the branch, make some changes to
GitTest.mdthere, and push the changes to GitHub. - Then, merge the changes from your
new-featurebranch tomasterbranch by using a) pull request in GitHub b)git mergefrom command line
GitLens
- To make the Git workflow easier, install the GitLens extension to VS code
- It helps in managing conflicts, comparing branches or commits
- Install it from the Extensions panel (access with CTRL+SHIFT+X)
- Adds many new views to the source control tab:
- Commits
- Repositories
- File History
- Line History
- Branches
- Remotes
- etc...
3. Conflicts
Conflicts
- Sometimes two people have made changes in the same lines of code!
- This leads to a conflict.
- Let's assume we're trying to merge changes from featureBranch to master.
- If a conflict happens, the merge does not conclude automatically. Instead, we need to fix all the conflicts by hand and then conclude the merge with some commands.
- Conflicting lines of code are framed by some
<<<<<<< garbage ======= symbols >>>>>>>we don't yet understand - Before we can conclude the merge, we need to get rid of the garbage.
Said garbage
<<<<<<< HEAD:Player.cs
  if (Input.anyKey) {
    return true;
  }
=======
  if (Input.anyKey)
      return true;
>>>>>>> featureBranch:Player.cs
- Current change is between
<<<<<<<and=======: old code inmaster - Incoming change is between
>>>>>>>and=======: new code fromfeatureBranch - Use your text editor to choose which (or some combination of both) you want to preserve
VS Code tools
- VS Code gives us tools to make conflict resolution a quick process
- Click which lines of code you want to preserve:
- Accept Current Change (old code is preserved, new code removed)
- Accept Incoming Change (new code is preserved, old code removed)
- Accept Both Changes (both are preserved)

After resolving the conflict
- After resolving conflicting files, use
git add <filename>to add them to the commit - Then use
git committo apply changes (without a message! no-m)- Close the automatically opened
COMMITMSGfile. This should finish the merge.
- Close the automatically opened
- Then just
git pushto apply changes in the remote repository
Exercise 2. Fixing conflicts
- Create a new branch in your local repository, but do not checkout it just yet.
- First, we simulate your teammate's changes by making changes to the
masterbranch directly: On themasterbranch, make some changes toGitTest.md, and add & commit. - Then, checkout the new feature branch.
- Then, make some other changes to GitTest.md to the same line as before, add & commit.
- Then, merge the changes from the
masterbranch to your feature branch by usinggit merge - Fix the ensuing conflicts, add & commit & push.
- Now you can create a pull request to merge your changes to the master branch.
Git workflow 3: Undoing
- Git doesn't have a general "undo" command
- If you make a mistake, it is very case-specific what you need to do to fix it
- See undo options here
- Also, ohshitgit.com
git log & git checkout <hashcode>
-
Use
git logto see the commit history- Or
git log --onelinefor a more concise version - Press Q to quit the log view.
- The newest changes are seen on top
- On the left side of the commit message you see the hashcode of the commit
- Use
git checkout <hashcode>to "time travel" into the commit
- Or
-
Note: If you have GitLens, check the Commits view in the Source control tab to see the commit history.
Revert one file to a previous state
- Sometimes you want to revert just one file to its previous state
- For that, you need to figure out the commit hash of the state you want to return to
- Find that out in one of the following methods:
git log --oneline- VS Code: Source control > File history
- GitHub: check commits
- Then, run
git checkout <commit-hash> -- <filename>
Collaboration in Unity
- The zeroth rule: Make sure that everyone on team uses the same Unity and package versions.
- The first rule: Don't ever work on the same thing simultaneously.
- The second rule: When you do break rule #1, make necessary changes in communication so you won't break it again.
- Be sure to communicate about scene ownership
- Scenes are not code files, so you can't easily merge changes if two people have worked on them
- Thus, the Scene Owner will be the only person on the team who should be working on a certain scene
- If a scene needs GameObject contributions from others, they can create prefabs that the Scene Owners then add to their scene
Exercise 3. Branching team effort
- Work as a group for this assignment.
- Continue Exercise 2 from Git basics.
- Every group member creates an individual branch from the master, and makes some changes to the
GitTest.mdfile. - Add new files as well, at least one per group member.
- Do not tell other group members what you're going to change! :D
- Then, merge the changes back to the master branch. Fix ensuing conflicts, if any appear.
Reading
Very extra: git rebase
git mergecreates a new commit for the merge process- Sometimes that's undesirable, so an alternative is to use
git rebase - Unlike merge, rebase applies changes from the rebased branch one commit at a time
- Whenever there's a conflict:
- After fixing the conflict, add the conflicting file with
git add <filename> - Then continue the rebase process with
git rebase --continue - If you want to disregard a conflicting commit, use
git rebase --skip - If you get cold feet, you can cancel the rebase with
git rebase --abort
- Note: A good link for understanding rebase
Very very extra: Git submodules
- To add external code to your project from someone else's repository, Git has a neat system called submodules
- To add a submodule to your project, use
git submodule add <submodule-url> <folder> - To remove a submodule, use
git rm <path-to-submodule> - If you clone a project with submodules, you need to run
git submodule update --init --recursiveonce. - Note: If you don't want submodules to appear in the Source control tab of VS Code, go to settings and disable the Git: Detect Submodules setting.